Most people start diamond shopping by chasing carat weight. That’s a mistake. Carat tells you size. It does not tell you sparkle. The only “C” that guarantees brilliance is cut. A well-cut diamond redirects light back to your eye. A poorly cut diamond leaks light and looks dull, even if it’s big, colorless, and “flawless.” Here’s how to judge cut the right way and avoid paying for size that doesn’t shine.
What “cut” really means (and what it doesn’t)
Cut is not shape. Round, oval, cushion, and princess are shapes. Cut is how well a diamond has been proportioned, faceted, and finished. It covers three linked ideas:
- Proportions: angles and relative sizes of facets (table, crown, pavilion, depth, etc.). These control light return.
- Symmetry: how precisely facets line up. Better symmetry creates even patterns and consistent sparkle.
- Polish: surface smoothness. Better polish reduces haze and helps light pass cleanly.
Why it matters: Diamonds act like mirrors and prisms. If angles are right, light reflects and refracts back to you as brightness (white light) and fire (colored flashes). If angles are off, light exits through the bottom or sides. That’s leakage, and it kills sparkle.
How labs grade cut (and where they don’t)
For round brilliants, major labs assign an overall cut grade. The most common scale is Excellent, Very Good, Good, Fair, Poor. That grade considers proportions, symmetry, and polish together. An “Excellent” cut round is usually safe, but not all Excellents are equal. Some are bright and crisp; others are borderline.
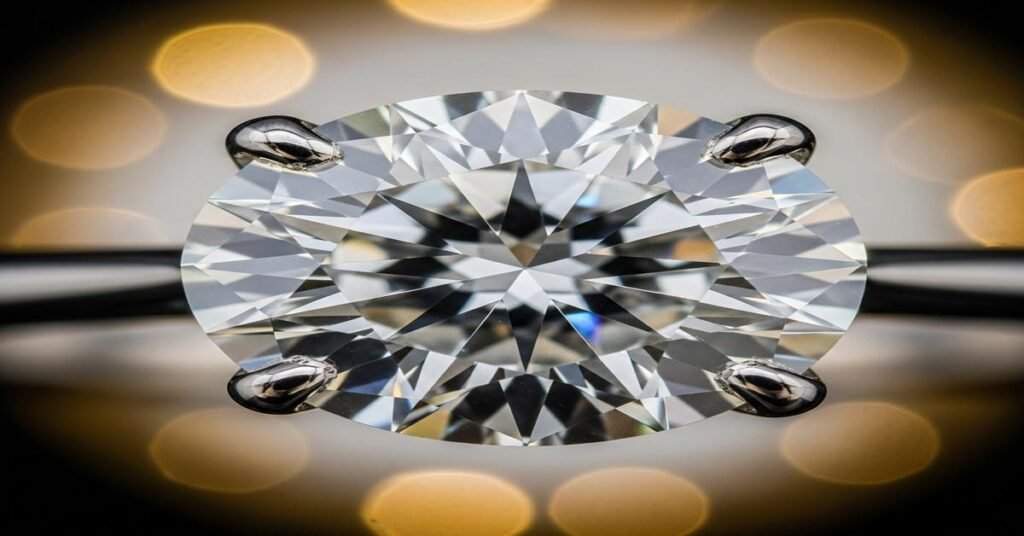
For fancy shapes (oval, cushion, princess, pear, marquise, emerald, radiant), most labs do not give an overall cut grade. You must evaluate performance yourself using pattern, proportions, and images. Two ovals with the same carat can look totally different—one lively, one flat with a dark bow-tie. That’s why your eyes and tools matter.
The “sweet spot” proportions for round brilliants
Use the report’s measurements (not seller marketing) to screen rounds. The goal is balanced angles that maximize light return and create crisp contrast.
- Table %: 54–58. Smaller tables increase fire; larger tables trade fire for brightness. Over ~60 often looks glassy.
- Total depth %: 60–62.3. Too shallow leaks through the pavilion; too deep looks small for its weight and can darken.
- Crown angle: 34.0–35.0°. Adds fire. Outside this, you risk flatness (too low) or darkness (too steep).
- Pavilion angle: 40.6–40.9°. This is critical for brightness. Steeper or shallower increases leakage.
- Girdle: Thin to Medium or Medium to Slightly Thick, even. Avoid Very Thin (chipping risk) or Very Thick (hidden weight, smaller face-up size).
- Lower Girdle Facet length: ~75–80%. Shorter gives chunkier flashes; longer gives splintery, faster scintillation. Either can be beautiful when balanced.
- Star length: ~45–55%. Extremes can distort the pattern.
- Symmetry & polish: Excellent/Excellent preferred.
Bad combos to avoid:
- Steep–deep: Crown angle 35.5°+ plus pavilion 41.0°+. These look dark in the center and face up small.
- Shallow–shallow: Crown under 33° with pavilion under 40.6°. Often show a “fish-eye” and washed-out brightness.
- Large table + low crown: Table 61–64% with crown under 33°. Bright but flat, with weak fire.
Remember: A GIA “Excellent” can include some borderline pairs like 35.5°/41.0°. Numbers are a filter, not the finish line. Always confirm with images or in-person viewing.
Performance: what your eyes should see
Beyond numbers, judge how the diamond behaves in real light. You’re looking for a balanced performance:
- Brightness: Lots of white light return across the face, not just the center.
- Fire: Clear, colorful flashes when you tilt it under spotlights or sunlight.
- Scintillation: On-and-off sparkle as you move it. The pattern should be crisp, not mushy.
- Contrast: A pleasing balance of light and dark areas. Good contrast makes the stone look sharp and lively.
Simple tests at a jeweler:
- Mixed lighting test: View under spotlights, diffused store lighting, and by a window. A top cut stays lively in all three; a weak one only pops under jewelry spotlights.
- Tilt test: Rock it slowly. You should see even, symmetrical flashes, not dull zones or a dark center.
- Distance test: Hold it at arm’s length. Does it still sparkle, or does it go quiet?
Use simple tools: Ideal-Scope, ASET, and Hearts & Arrows
You don’t need to be a gemologist. A few images reveal a lot:
- Ideal-Scope: Shows light return (red) and leakage (white). Aim for mostly red with minimal white. White around the edge means leakage and weaker edge brightness.
- ASET: Red = bright light, green = low-angle light, blue = contrast, white/black = leakage. Balanced red with clean, intentional blue contrast is ideal.
- Hearts & Arrows (rounds): Clean, consistent hearts and arrows indicate top-tier symmetry and precise cutting. It doesn’t guarantee brightness by itself, but it’s a strong signal of craftsmanship.
Common pitfalls and red flags
- “Excellent” is not enough: Confirm angles and images. Some Excellent stones leak light or face up small.
- Very thin girdle: Chipping risk in setting and wear. Avoid for rings.
- Very thick girdle: Hidden weight; the diamond looks smaller than it should.
- Too-shallow or too-deep: Both reduce brilliance and spread. A 1.00 ct deep stone can look like a well-cut 0.90 ct.
- Oversized table: Often weak fire and glassy look.
- Strong bow-tie (ovals, pears, marquise): A dark band across the middle that doesn’t brighten with tilt is a dealbreaker.
- “Crushed ice” cushions/radiants: Many tiny facets with chaotic sparkle. Some love it; others find it mushy. Compare side by side.
Fancy shapes: how to judge without a cut grade
Because fancy shapes lack a standard cut grade, rely on videos, ASET/Ideal-Scope, and your eyes. Look for brightness across the stone and an appealing pattern.
- Oval: Check for a minimal bow-tie that disappears or lightens as you tilt. Aim for even brightness to the tips. Many nice ovals fall around table 54–60% and depth 60–63%, but patterns matter more than numbers.
- Pear & Marquise: Bow-tie can be stronger here. Make sure tips are bright and not see-through. Symmetry matters so the shape looks balanced on the finger.
- Cushion: Two families: chunky (bigger, slower flashes) and crushed ice (sparkle everywhere but smaller flashes). Choose by taste. ASET helps you avoid dead centers.
- Princess: Look for even brightness with a crisp X pattern. Protect sharp corners with prongs.
- Emerald & Asscher: Step cuts show everything. You want clean, mirror-like steps with distinct flashes. Prioritize eye-clean clarity and strong polish/symmetry.
Budget strategy: put your money where it sparkles
Cut first. Then optimize the other Cs to support it:
- Carat: Be flexible. A 0.90 ct with top cut can out-sparkle a dull 1.00 ct and face up similarly if the 1.00 ct is deep.
- Color: For rounds in white metal, G–H looks white to most people. In yellow or rose gold, I–J can still face up white.
- Clarity: Aim for eye-clean. VS2 to SI1 often looks identical to higher grades to the naked eye. Spend the savings on better cut.
- Setting: Thin, bright settings make the center stone look larger. A halo adds spread without paying for more carat.
Shopping checklist: in-store and online
In-store:
- Insist on the grading report. Note table %, depth %, crown and pavilion angles (for rounds).
- Compare at least three stones under different lights. Your eyes will find the winner fast.
- Ask for Ideal-Scope/ASET or a hearts viewer for rounds.
Online:
- Request 360° video, face-up and tilt, plus ASET/Ideal-Scope for fancy shapes.
- For rounds, pre-filter to the proportion ranges above, then confirm with images or performance data.
- Check return policy so you can compare at home and send back if it underperforms.
Maintenance: even the best cut needs to be clean
Oil and soap film kill sparkle. A superb cut looks average when dirty. Keep it clean:
- Weekly at home: warm water, a drop of dish soap, soft brush under the stone, rinse, pat dry.
- Monthly: ultrasonic cleaner if the setting is sturdy and stones are secure.
- After lotion, sunscreen, or cooking, expect dullness. A quick clean restores brilliance.
Myths that waste your money
- “Bigger always looks better.” Not if it’s badly cut. Dull is dull at any size.
- “Flawless means best sparkle.” Clarity doesn’t control light return. Cut does.
- “More facets = more sparkle.” Only if angles and pattern are right. Extra facets can hide chips, not boost brightness.
- “Strong fluorescence is bad.” Often neutral or even helpful in lower colors. Judge stone by stone.
Real-world examples
- Example 1: Two round diamonds. A: 1.00 ct, H, SI1, Very Good cut, table 61%, depth 63%, crown 32.5°, pavilion 41.4°. B: 0.90 ct, H, SI1, Excellent cut, table 56%, depth 61.7%, crown 34.5°, pavilion 40.8°. In person, B looks brighter, has more fire, and can face up nearly as large. B wins.
- Example 2: Two ovals, both 1.50 ct. One shows a strong, fixed bow-tie that stays dark as you tilt. The other shows a faint bow-tie that lights up with movement. The second will look lively day to day. Choose the one that “breathes.”
Bottom line
If you want sparkle, prioritize cut. Use proportion targets to filter. Confirm with images and simple tools like ASET or Ideal-Scope. Judge performance in varied lighting, not just under spotlights. Then balance color and clarity to fit your budget. A smaller, well-cut diamond will outshine a larger, mediocre one every time—and that brilliance is what people notice.
I am Satyam Pandey, a gemologist with a Diploma in Polished Diamond Grading from KGK Academy, Jaipur. I love writing about jewelry, gems, and diamonds, and I share simple, honest reviews and easy buying tips on JewellersReviews.com to help you choose pieces you’ll love with confidence.