Approving a CAD render for a custom ring is a big moment. A render looks perfect on screen. But small mistakes in the CAD can cause big problems in the finished ring: weak prongs, ill-fitting stones, uncomfortable fit, or odd proportions. Below are seven concrete red flags to watch for in a CAD render and what to ask for before you sign off. I explain why each issue matters and give specific, practical fixes you can request from your jeweler.
-
No clear dimensions or cross-sections.
Why it matters: A pretty image doesn’t prove the ring’s size or strength. You need exact measurements to judge durability and fit.
What to look for: top view with mm scale, profile view with heights in mm, and a cross-section through the center stone and shank. Example: a 1 ct round has a table ~6.5 mm. Ask to see that seat diameter and bezel/prong heights in mm.
How to fix it: Request dimensioned screenshots or a PDF with annotated measurements. Ask for a 1:1 STL file or a resin print so you can physically confirm size and proportions.
-
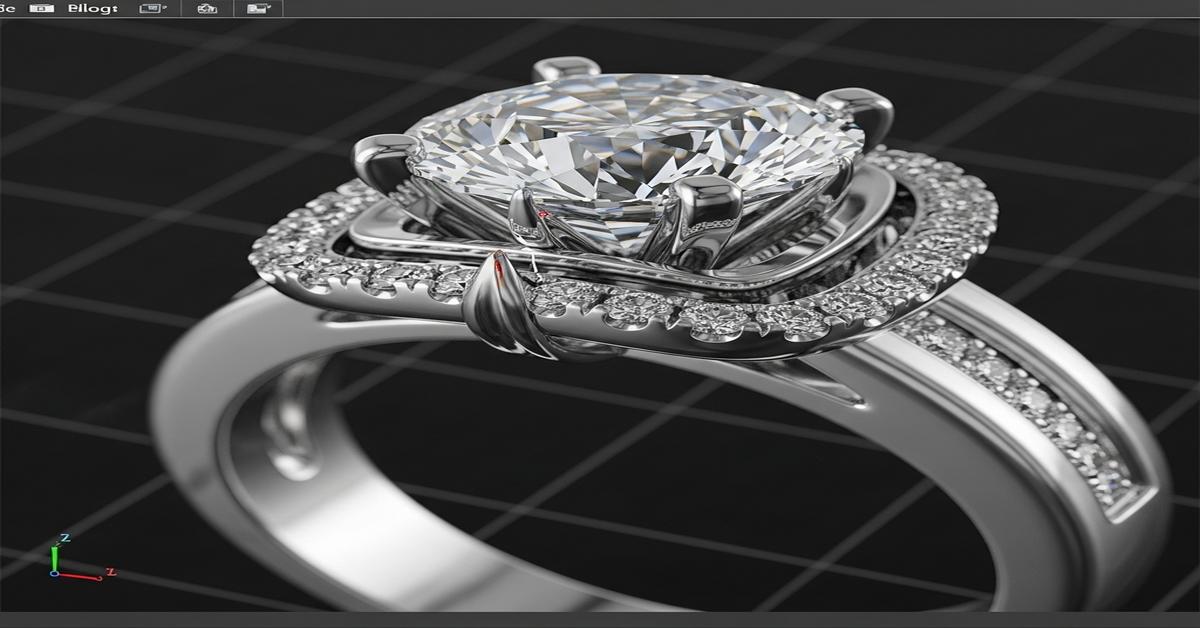
Prongs or walls look paper-thin in the render.
Why it matters: Thin metal is weak. It bends, breaks, or wears through. Renders can make thin features look elegant but impossible to cast or finish.
Specific numbers: For a 1 ct round (6.5 mm) center, use prong bases about 1.4–1.8 mm thick in 18k gold and 1.8–2.2 mm in platinum. Prong tips (after burnishing) should end up around 0.8–1.0 mm. Shank thickness under the finger should be at least 1.4 mm for everyday wear in 14–18k gold; 1.6–2.0 mm is better for platinum.
How to fix it: Ask the CAD artist to annotate prong cross-sections and shank thickness. If thin, increase cross-section or change metal to a tougher alloy (14k vs 18k) and update the render.
-
Stone seat mismatch or missing seat detail.
Why it matters: The CAD must match the stone’s exact dimensions. If the seat is too shallow or the wrong shape, the stone won’t sit securely and can chip.
What to check: Provide the stone’s exact specs: carat, mm diameter, girdle profile, and pavilion depth. Example: a 0.75 ct round may be ~5.8–6.0 mm—confirm the seat diameter and the depth of the seat relative to the ring’s profile. For baguettes and emerald cuts, the seat should match length, width, and corner radius to ±0.1 mm.
How to fix it: Ask for a cross-section through the setting showing the seat depth and the metal-to-stone clearance. Request a test fit on a wax/resin print before casting.
-
Pavé or melee spacing looks inconsistent.
Why it matters: Incorrect spacing creates weak beads or squashed stones. Too little metal between stones causes breakage. Too much metal looks clunky.
Numbers to use: For melee stones 1.0–1.5 mm, maintain at least 0.7–1.0 mm of metal between stones for strength. Bead sizes should match stone size—bead height ~0.15–0.25 mm above the stone girdle for secure setting.
How to fix it: Ask for a close-up render of the pavé area with mm measurements. Request the CAD artist to place one or two actual stones in the CAD to verify spacing and bead size.
-
Channel walls, rails, or bezels lack proper thickness or support.
Why it matters: Channels and bezels must support stone girdles and handle side impacts. Thin channel walls can dent or open up.
Guidelines: Channel walls should be at least 0.8–1.2 mm thick for gold and 1.0–1.4 mm for platinum, depending on stone size. Channel floor must be flat and slightly raised to support girdles—no thin cutouts beneath stones.
How to fix it: Request a channel cross-section showing wall thickness and floor height. Ask the jeweler to explain how they’ll seat and burnish the stones in the chosen metal.
-
Unrealistic sharp edges, tiny fillets, or no under-gallery.
Why it matters: Sharp internal edges don’t cast cleanly and create stress risers. A lack of fillets or under-gallery makes the ring uncomfortable and harder to finish.
What to look for: Internal fillet radii of 0.2–0.5 mm where surfaces join. A clear under-gallery with enough clearance so the ring sits comfortably on the finger—at least 1.0–1.5 mm of clearance under large centers.
How to fix it: Ask the CAD artist to add fillets and produce a section view to confirm the internal shapes. Ask for a high-detail resin print to check finish and feel.
-
No physical prototype or low-resolution STL tolerances.
Why it matters: Renders can hide practical problems like porosity, fit, and finish. A 3D print or wax model reveals issues before casting.
What to request: A high-resolution STL with a stated tolerance (±0.05–0.1 mm for jewelry). Better yet, a direct resin print or polished wax for hands-on review. If you can, have the stone(s) temporarily set in the resin print to check fit and proportion.
How to fix it: Insist on a prototype step in the process. Approve the prototype before final casting and plating.
Quick checklist to hand your jeweler before approval:
- Provide exact stone specs (ct, mm, girdle, table, pavilion) and ask the CAD to match them.
- Demand dimensioned views: top, profile, cross-section in mm.
- Confirm prong, bezel, channel, and shank thicknesses in mm and by alloy.
- Request STL and a resin or wax print for physical inspection.
- Clarify alloy: 14k vs 18k gold or platinum 950—each requires different minimums.
- Ask for setting-proof photos of a prototype with the actual stone (or a calibrated dummy stone).
Renders are useful but not sufficient. Ask for numbers, not just pretty pictures. Insist on cross-sections and prototypes. That way the ring you approve will look like the ring you receive—and it will wear well for years.
I am G S Sachin, a gemologist with a Diploma in Polished Diamond Grading from KGK Academy, Jaipur. I love writing about jewelry, gems, and diamonds, and I share simple, honest reviews and easy buying tips on JewellersReviews.com to help you choose pieces you’ll love with confidence.