Opal can look like magic. Flashes of color jump as you tilt the stone. But not all opal forms in nature. One of the most reliable clues that an opal was grown in a lab is the so‑called “lizard skin” pattern. It is a surface mosaic made of repeating, neatly edged patches. That mosaic sits on top of a deeper, vertical structure. Once you know what to look for, you will spot it fast. This guide explains what the pattern is, why it happens, and how to confirm it without special instruments.
What gemologists mean by “lizard skin”
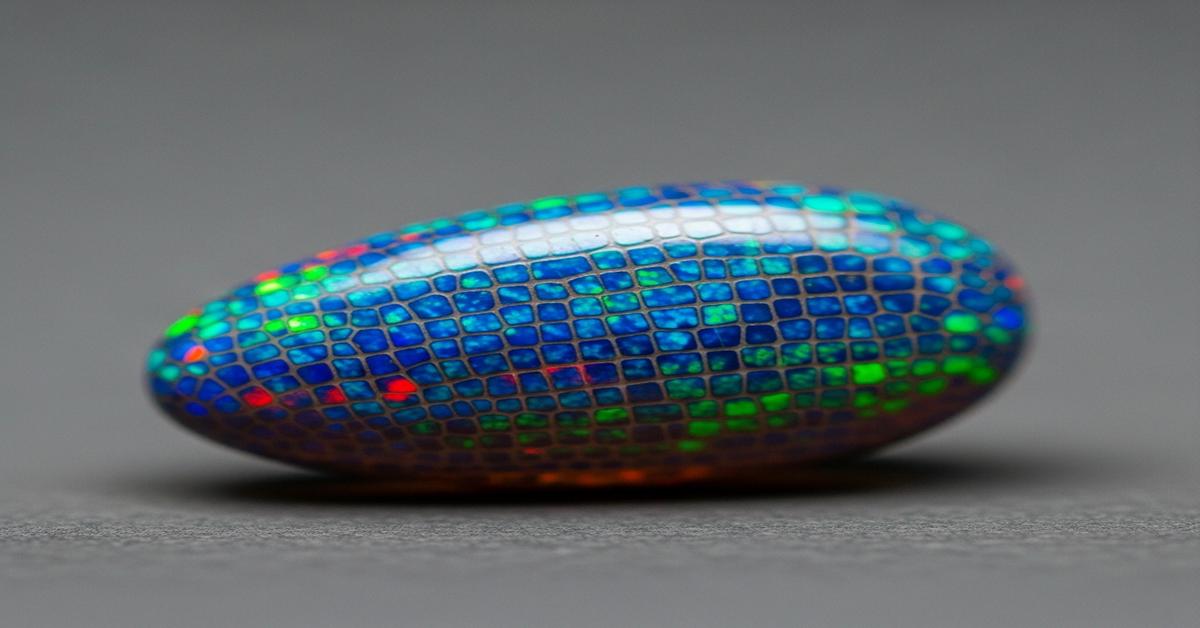
“Lizard skin” (also called snakeskin or chicken‑wire) is a repeating mosaic of color patches. The patches are similar in size and shape. The edges between patches look crisp and straight, as if drawn with a ruler. The pattern usually covers the whole face of the cabochon with surprising uniformity.
Natural opal can show blocky color, but its patches tend to vary in size, bleed into each other, or break off near edges. With lab opal, the mosaic looks organized. The eye catches the regularity. That regularity is your first red flag.
Why lab-grown opal forms the columnar pattern
Opal’s color comes from tiny silica spheres packed together. The spheres diffract light, like a miniature 3D rainbow grating. In nature, spheres settle and harden in an irregular gel. Domains are messy and patchy, so color patches vary widely.
In many lab processes, spheres settle in a controlled way. They line up into neat domains, and those domains grow upward like stalks. Think of a field of tightly planted columns. Where domains meet, you get straight boundaries. On the surface, those boundaries show as the “lizard skin” mosaic. From the side, you can sometimes see the columns themselves. That columnar growth is not how natural opal typically builds, which is why it is such a strong indicator.
Some lab opals also contain polymer binders. That stabilizes the columns, keeps gaps clean, and makes the pattern even more regular. The result is a pristine, repeating texture that nature rarely produces over a whole gem.
How to spot it in hand: a step-by-step check
- Light: Use bright, diffused light. A white LED desk lamp or daylight by a window works. Avoid harsh spotlights at first.
- Magnification: Use a 10× loupe if you have one. If not, move the stone closer to your eye and adjust the light.
- Tilt: Rock the stone slowly in several directions. Watch how the patches light up and switch off.
- Views: Inspect from the top, then the side. The side view is critical.
Top view: telltale surface clues
- Even patch size: The color patches look similar in size over most of the face. In natural opal, patch sizes tend to change more.
- Straight borders: You see short straight segments forming polygon shapes. Natural patch boundaries are often wavy or frayed.
- Repetition: As you tilt, the same arrangement keeps reappearing. In natural opal, color is lively but less predictable.
- Grid feeling: Your brain senses order—like tiles or a honeycomb—rather than random sparkles.
- Color “cells” that switch together: Entire patches blink as units. In natural opal, color often ripples across a patch.
Why these matter: Regular, repeated geometry usually points to controlled growth. Nature can make local order, but not a near-perfect mosaic across a whole gem without interruptions.
Side view: the clincher—columns
Turn the cabochon and inspect the edge.
- Vertical columns: Look for fine, straight, parallel lines running from the base toward the dome. They can look like narrow pipes or striations.
- Stacked layers: In some synthetics, you may see faint horizontal banding combined with vertical structure—another manufactured clue.
- Continuity: The same rhythm you saw on top carries down the sides. Natural opal rarely shows long, clean vertical columns tied to the surface pattern.
Why this clinches it: The columnar architecture is a direct result of how lab opal domains grow. Nature does not build these straight, even columns over large areas.
How not to be fooled: natural patterns that look similar
Three natural looks can trick you at first glance:
- True harlequin: Rare natural pattern with blocky, diamond‑like patches. Differences from lizard skin: patch sizes vary more, edges are less ruler‑straight, and uniformity rarely holds across the whole stone.
- Honeycomb Welo opal (Ethiopia): Can show “cells” that resemble a grid under certain lighting. Differences: cells often warp near edges, sizes vary, and the side view lacks strong, straight columns. Hydrophane behavior (absorbs water and goes more transparent) is common in Welo, which is unlike many polymer‑stabilized lab opals.
- Pinfire clusters: Many small, tight flashes can clump into apparent patches. Differences: no straight borders, and the pattern looks speckled, not tiled.
When in doubt, trust the side view and the overall regularity. It is the combination—the tiled surface plus vertical columns—that is the real giveaway.
Other supporting tests (non-destructive)
- Directionality: Lab opals often keep their mosaic even as you rotate the stone far. Natural opals usually change personality more dramatically with tilt.
- Backlight: Shine a small light through the stone. In many synthetics, the internal structure looks clean and consistent. Natural opal often shows cloudy zones, potch layers, or uneven density.
- Weight feel: Some lab opals with polymer binders feel slightly lighter than a natural opal of the same size. This is subtle and best used as a tie‑breaker, not a primary test.
- Surface perfection: Lab opal rough is made to be clean. A large stone with flawless polish, no pits, no sand, and perfect pattern at a bargain price is suspicious.
Avoid destructive tests. If the stone is valuable, a professional gem lab can confirm with microscopy and advanced imaging.
Separating synthetics from doublets and triplets
“Lizard skin” identifies synthetic opal material. Assembled stones are a different issue.
- Doublet: Thin slice of opal on a dark backing. Look for a clear glue line when viewed from the side.
- Triplet: Even thinner opal slice with a domed clear cap on top (often quartz or plastic). The dome is very high and perfectly clear; the opal layer looks thin and uniform.
These can be natural or synthetic opal layers. The columnar/lizard‑skin pattern still tells you the opal itself is lab‑grown, even if it is part of an assembly.
Common pitfalls and red flags at purchase
- Too perfect, too big, too cheap: A large stone with uniform mosaic and blazing color across the whole face is more likely synthetic.
- Pattern uniformity front to back: If the same crisp pattern continues across every angle, be cautious.
- Seller language: “Created,” “lab‑grown,” “synthetic,” and “Gilson‑type” indicate man‑made; “simulant” can mean plastic or glass imitating opal.
Quick identification checklist
- Do you see a repeating, tiled mosaic with crisp, straight borders? If yes, suspect lab‑grown.
- From the side, do you see straight vertical columns or striations tied to the surface pattern? If yes, strong evidence of synthetic.
- Is the pattern uniform across the whole face with very similar patch sizes? If yes, more evidence.
- Do natural look‑alikes (true harlequin, honeycomb Welo) fail to show columns and perfect uniformity? If yes, your ID holds.
Why the pattern is the “dead giveaway”
Gem identification is usually about clusters of clues, not a single sign. The lizard‑skin pattern is an exception because it ties directly to the growth mechanism. The tidy mosaic on top and the columns along the side are both products of controlled, vertical domain growth. Nature does not arrange silica spheres into neat, repeating columns over an entire gem. That is why, when you see lizard skin backed by columnar structure, you can call it lab‑grown with confidence.
When to seek a lab report
Get a report if the stone is expensive, has a confusing pattern, or you plan to resell it. A lab can document the columnar structure under a microscope and confirm whether the material is synthetic, natural, or an assembly. That paperwork protects you and the next owner.
Bottom line: Learn the look of “lizard skin.” Confirm it by checking the side for columns. Use the whole set of clues—regularity, crisp borders, vertical structure, and consistency—to separate lab‑grown opal from nature’s more chaotic beauty. Once you have seen it a few times, you will recognize it in seconds.
I am Satyam Pandey, a gemologist with a Diploma in Polished Diamond Grading from KGK Academy, Jaipur. I love writing about jewelry, gems, and diamonds, and I share simple, honest reviews and easy buying tips on JewellersReviews.com to help you choose pieces you’ll love with confidence.