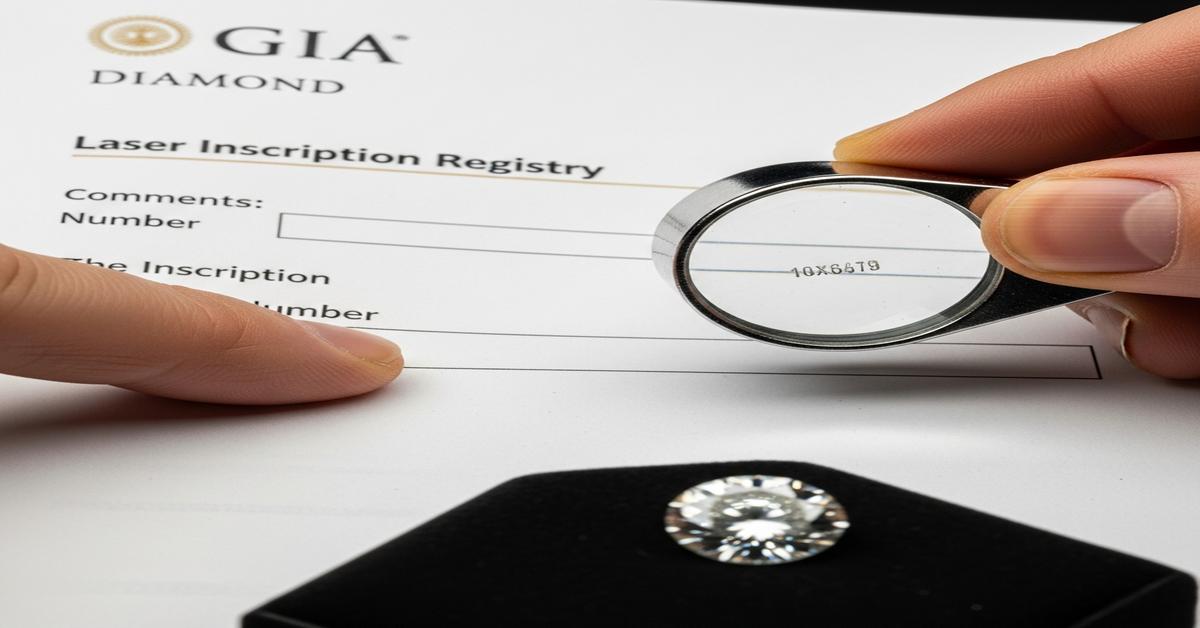
When you buy a diamond with a GIA report, your most practical way to prove that the stone in your hand is the stone on the report is the laser inscription on the diamond’s girdle. A 10x loupe lets you read that inscription. Once you match it to the report and the report type says the diamond is natural (not laboratory-grown), you’ve confirmed what you have. Here is how to read a GIA report correctly, why the inscription matters, and how to use a loupe to verify your diamond.
What a GIA report actually tells you
A GIA report is an identification and grading document for a specific diamond. It records the stone’s measurable facts so anyone can recognize it. The key sections are:
- Report title: This tells you if the diamond is natural or lab-grown. A natural diamond has a standard “GIA Diamond Grading Report” (or “Diamond Dossier”). A lab-grown diamond has a “GIA Laboratory-Grown Diamond Report.” If the title says laboratory-grown, the stone is not natural. This matters because you cannot tell natural vs. lab-grown by eye alone.
- Report number: A unique ID, for example “1234567890.” This is the number you expect to see laser-inscribed on the diamond’s girdle. It ties that physical stone to this document.
- Shape and cutting style: Round brilliant, oval, princess, etc. If your stone’s shape doesn’t match, the report is not for your diamond.
- Measurements: Length–width–depth, e.g., 6.49–6.53 × 3.98 mm. These are like a fingerprint. If the numbers are off beyond normal measurement tolerance, you have a mismatch.
- Carat weight: Exact to two decimals. It should align with the measurements and what you were sold.
- Color, clarity, cut grades: The quality summary. These don’t prove identity by themselves, but help you catch inconsistencies.
- Fluorescence, polish, symmetry: Secondary traits that also help confirm identity when you compare them to the stone.
- Clarity plot and comments: Maps key internal features for larger stones and lists special notes. The comments line usually includes the exact text of any laser inscription(s) on the girdle. This is where GIA records “Inscription(s): GIA 1234567890” and, for lab-grown stones, wording that identifies them as lab-grown. The plot and comments give you additional ways to match the stone.
Each item exists because diamonds can be swapped. If you only look at color and clarity, many stones could fit. But when you check the inscription, measurements, and clarity map together, the chance of a wrong match drops sharply.
Why the laser inscription is your only practical proof
The inscription is the only piece of information that physically lives on the diamond. It is the fastest way to connect the stone in your hand to the GIA report in your other hand. Without lab instruments, you cannot confirm origin by sight. With a loupe, you can read the inscription.
Important caveats:
- Not every diamond is inscribed. GIA Dossier diamonds are inscribed by default. Full Diamond Grading Reports may or may not include it unless requested. Always check the “Inscription(s)” line on the report. If the report lists an inscription, it should be on the stone.
- Inscription text matters. GIA-graded lab-grown diamonds are inscribed with the report number and wording that identifies them as laboratory-grown. Read the exact phrasing on the report and verify you see the same on the girdle.
- Inscription can be removed or faked. A dishonest actor could polish off or add an inscription. That is why you also cross-check the measurements, weight, and clarity features against the report. The inscription is your quickest proof, not your only check.
How to find and read the inscription with a 10x loupe
You don’t need a microscope. A clean stone, a proper 10x triplet loupe, and good light are enough.
- Clean the diamond. Oils blur the tiny lettering. Use a few drops of alcohol or jewelry cleaner and a lint-free cloth. Dry it.
- Set up light and posture. Sit at a table. Plant your elbows. Hold the loupe close to your eye. Bring the diamond to the loupe until it focuses. Use a bright LED pointed from the side, not straight through the stone.
- Find the girdle. The girdle is the thin band around the diamond’s widest point. The inscription is micro-etched on this edge, usually in one small section.
- Scan the entire girdle. Rotate the diamond slowly. Rock it slightly to catch the frosted letters. You are looking for tiny raised or matte-looking characters like “GIA 1234567890.” On some stones, the inscription sits under or near a prong; you may need to view from different angles.
- Read in segments. Don’t try to see the whole line at once. Find a block of 3–4 characters, memorize them, rotate a bit more, then continue. Write the number down as you go.
- Photograph if needed. Place your phone camera against the loupe and try side lighting. A slow, steady hand helps. A quick photo can confirm confusing digits like 6/8 or 3/5.
If the stone is set and the inscription is fully hidden by prongs, do not bend or move the setting yourself. Ask a jeweler to locate it under a microscope. They can also rotate the stone slightly if safe.
Match the inscription to the report, step by step
- Step 1: Confirm the report title. If it says “Laboratory-Grown Diamond Report,” your stone is lab-grown. If it is a standard “Diamond Grading Report” or “Diamond Dossier,” you are dealing with a natural diamond report.
- Step 2: Match the exact inscription text. The report’s “Inscription(s)” line should list what is on the girdle. For example, “Inscription(s): GIA 1234567890.” If your stone is lab-grown, the inscription listing will include wording that identifies it as laboratory-grown. The characters on the stone must match this line.
- Step 3: Check measurements and weight. Compare the report’s measurements and carat weight to the stone’s. A jeweler can weigh a loose stone and measure it. For a set stone, you can still compare measurement ranges and proportions under a microscope. Large mismatches are a red flag.
- Step 4: Compare secondary traits. Shape, cut grade (for rounds), fluorescence, polish, symmetry. These should all match. Example: If the report says “Medium Blue fluorescence,” you should see a medium glow under UV light, not “None.”
- Step 5: Use the clarity map (if present). Find a plotted inclusion in a unique position, like a crystal under a specific crown facet. Try to spot it with your loupe. You may not see every inclusion at 10x, but finding a few distinctive ones builds confidence.
What a loupe can and cannot tell you about “natural”
- Can do: Read the inscription, then read the report title. If the report is a standard GIA diamond report and not a lab-grown report, you have confirmation of a natural diamond — assuming the inscription and other details match.
- Cannot do: A loupe cannot independently tell natural from lab-grown with certainty. Some inclusions hint at growth method, but visual signs can overlap. You need a lab report to be sure. That is why the inscription is so important — it connects your stone to the correct report.
If there is no inscription
No inscription does not automatically mean trouble, but it raises the bar for verification.
- Check the report first. Confirm it is a natural diamond report and review all details.
- Match the stone by measurements and clarity plot. Use a jeweler’s microscope to measure and to find distinctive inclusions in the exact positions shown on the plot. The more unique the inclusion pattern, the stronger the match.
- Consider adding an inscription. You can submit the diamond to GIA to inscribe the report number. This gives you an easy, future-proof way to re-identify the stone.
- Document everything. Take photos through the microscope of key inclusions and keep them with the report.
Red flags and common mistakes
- Assuming “GIA report” means natural. GIA grades both natural and lab-grown diamonds. The report title must say what it is.
- Reading only the number, not the wording. For lab-grown stones, the inscription includes wording that identifies laboratory-grown. If you see any wording beyond the number, compare it to the report’s “Inscription(s)” line.
- Ignoring mismatched details. If the inscription matches but measurements or fluorescence don’t, pause. Someone could have altered, misread, or misrepresented the stone.
- Confusing brand marks with GIA numbers. Some diamonds carry maker’s logos or in-house serials alongside the GIA number. The report number should start with “GIA” followed by digits. Verify exactly what the report lists.
- Expecting to see the inscription instantly. It’s tiny and can sit under a prong. Take your time or use a jeweler’s microscope.
A quick verification checklist
- Clean the diamond.
- Find and read the girdle inscription with a 10x loupe.
- Match the inscription to the report’s “Inscription(s)” line.
- Confirm the report title is a standard diamond report (not laboratory-grown).
- Cross-check shape, measurements, carat weight, cut grade, fluorescence, polish, symmetry.
- Spot at least one or two plotted inclusions in the same positions (if a plot exists).
- Photograph the inscription and key inclusions for your records.
Practical habits that protect you
- Take photos now. Capture the inscription and a couple of clear inclusion shots through a loupe or microscope. Keep them with the report and your invoice.
- Re-check after servicing. After a resize, prong work, or polishing, re-read the inscription. If it’s faint, ask to have it re-inscribed.
- Insure with specifics. Provide your insurer with the report number, measurements, and photos. If the stone is ever lost or swapped, you have hard identifiers.
The bottom line: the laser inscription is your only quick, on-the-diamond proof that links a physical stone to its GIA report. Use a loupe to read it, then verify the report title and the details. Back that up by checking measurements and a couple of plotted inclusions. Do this once, document it, and you can be confident every time you wear or service your natural diamond.
I am Satyam Pandey, a gemologist with a Diploma in Polished Diamond Grading from KGK Academy, Jaipur. I love writing about jewelry, gems, and diamonds, and I share simple, honest reviews and easy buying tips on JewellersReviews.com to help you choose pieces you’ll love with confidence.